
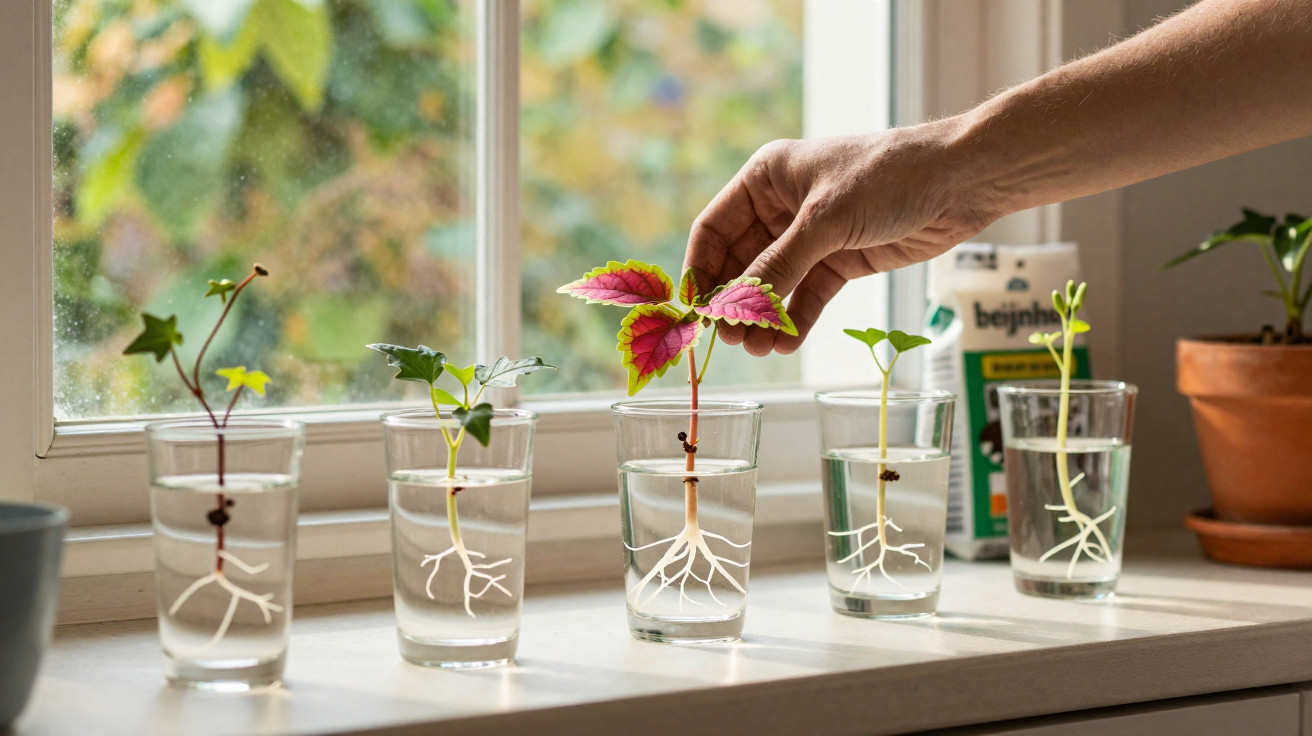
Rather than buying new plants, you can raise whole groups of young plants from just a few cut shoots. The secret is taking cuttings in a glass of water. Three especially rewarding choices – ivy, coleus and busy Lizzie – root exceptionally quickly in water, turning balconies, terraces and gardens into a dense, colourful backdrop within a few weeks.
Why June is the ideal month for water cuttings
Cuttings can generally be propagated successfully from April to September, but June provides almost perfect conditions. Plants are growing vigorously, while their shoots are young, supple and continuing to develop strongly. Temperatures also commonly remain between 20 and 25°C, a range in which cut surfaces seal quickly and fresh roots form particularly fast.
“Anyone putting cuttings in water now will often have strongly rooted young plants after just one to four weeks – entirely without a trip to the garden centre.”
The result is clearly visible outdoors: ivy swiftly covers drab fences or trails attractively from hanging baskets; coleus adds colour to pots and containers with its contrasting foliage; and busy Lizzie creates a carpet of flowers in shady spots. A small number of parent plants can therefore produce many new plants to position strategically around the garden.
What you really need for water cuttings
No specialist kit is required for this approach. Many amateur gardeners underestimate just how straightforward it is. Essentially, you need only a few everyday items:
- clean, sharp secateurs or a knife
- one or more glasses, small vases or clear cups
- tap water that has been left to stand for several hours
- a bright place away from strong midday sun, such as a windowsill or a well-lit hallway
Rooting hormones are usually unnecessary for ivy, coleus and busy Lizzie. You may use them if you already have them at home, although they make little difference with these undemanding plants.
Basic method: how to take water cuttings step by step
The underlying technique is the same for all three plants. Once you have mastered it, you can use it almost automatically throughout summer. The key steps are:
- Select a healthy, vigorous shoot, measuring 7 to 15 cm depending on the species.
- Make an angled cut just below a leaf node.
- Remove all leaves from the lower portion so that none can rot in the water.
- Submerge one or two nodes, keeping every leaf above the waterline.
- Replace the water every two to five days, according to the plant.
- Plant into compost when the roots are around 2.5 to 5 cm long.
Cutting below a node is crucial because this is where most root buds are found. Leaves left hanging in the water can rot easily, cloud the water and slow initial root growth. Keeping everything clean and changing the water regularly significantly improves the success rate.
Ivy in a glass of water: a free climber for filling gaps
Ivy is considered hardy and can sometimes grow almost too vigorously. That is useful for water cuttings, as this woody plant reliably produces fresh roots. Proceed as follows:
Making the right cut on ivy
Choose a strong trailing stem with several nodes. A length of about 10 to 15 cm works well. Cut immediately beneath a node, then strip leaves from the lower half or so of the shoot. The leaves retained at the top continue supplying the cutting with energy without allowing too much water to evaporate.
Place the shoot in a clear glass with one or two nodes under water. The shape of the glass matters very little; what counts is a clean container filled with fresh water. At temperatures of around 20°C, strong white roots usually develop within two to four weeks.
When to move ivy into compost
Once the roots measure roughly five centimetres, the cutting can be transferred to a pot containing a loose growing medium. A blend of multipurpose compost with a little sand or perlite helps prevent waterlogging. Growing ivy in a pot also makes it easier to control – ideal if you do not want it spreading unchecked through a border.
“Ivy propagated in a pot grows quickly, yet remains far more manageable than it does when planted directly in a border.”
After a short establishment period, use the young plants to green privacy screens, wall tops or hanging baskets.
Propagating coleus in water: a burst of colour for balconies and terraces
Coleus is among the most popular foliage plants for containers and window boxes. Varieties range from vivid pink shades to almost black leaves edged in bright colours. Many amateur gardeners purchase new plants every year, despite coleus being exceptionally easy to propagate from cuttings.
How to take the perfect coleus cutting
Take a shoot around 8 to 12 cm long, ensuring that you avoid flowering tips. Flowers use energy that is better directed towards forming new roots. Remove any flowers and leave only two or three leaves at the top.
After cutting, place the lower section in water up to a node. Fine roots often emerge after only one to two weeks at around room temperature. Change the water every three to five days to prevent bacteria and algae from building up.
From glass to pot: transplanting coleus correctly
Once a distinct cluster of roots measuring 2.5 to 5 cm has formed, the coleus cutting can go into fresh compost. Use low-nutrient, loose potting compost so the roots can branch rapidly. A partially shaded position is beneficial during the first few days after planting, preventing the young roots from drying out too quickly.
Later, the plants can be moved to a sunnier position if the variety tolerates it. Many coleus varieties develop especially intense leaf colour in brighter conditions, but will then need sufficient watering.
Busy Lizzie in a glass of water: a carpet of flowers for shade
Busy Lizzie flowers tirelessly throughout the summer, especially in partial shade and shade. It is almost always a good choice for brightening dark areas of the garden. Here, too, a handful of starter plants can quickly yield dozens of young plants.
Cutting and preparing busy Lizzie cuttings
Select a healthy, non-woody shoot tip measuring about 7 to 10 cm. Again, cut just below a node and remove every lower leaf as well as any buds. The cutting can then focus all its energy on producing roots.
Busy Lizzie is sensitive to rotting plant debris in the water, so more frequent water changes are worthwhile – every two to three days is ideal. Fine roots measuring 2.5 to 3 cm generally appear after just one to two weeks. This is enough root length to plant the young plants in small pots or directly into window boxes.
Planting into compost and care tips
Use loose, humus-rich compost and keep it evenly moist for the first few days, without saturating it. Busy Lizzies are sensitive to waterlogging, but they must never be allowed to dry out. On especially warm days, it is worth doing a quick finger test in the compost before reaching for the watering can.
“Those who keep taking cuttings and placing new ones in water can gradually fill window boxes, containers and borders with home-grown young plants throughout June.”
Common water-cutting mistakes and how to avoid them
Although the method appears simple, small details can cause some attempts to fail. Three issues are particularly likely to be frustrating:
- Position that is too dark: Root formation stalls without enough light. Bright positions without direct midday sun work best.
- Water changed too infrequently: Cloudy water encourages rot and restricts growth. Change it more often rather than risk root damage.
- Planting out too late: Very long water roots can snap easily during transplanting. It is better to plant when they are a few centimetres long and well branched.
When placing several cuttings in one glass, make sure the shoots do not overlap too heavily. Leaving a little space improves oxygen availability in the water and reduces the risk of rot. A transparent container makes it easier to spot changes early.
Using your free young plants cleverly in the garden
Having plenty of new young plants opens up exciting design possibilities. Ivy is excellent for disguising unsightly areas: old posts, weathered wooden sheds and bare wire fences can quickly disappear behind green foliage. Coleus makes a strong impression when several varieties are combined in one container – dark leaves at the back and bright varieties towards the front.
Busy Lizzies show their strengths in partly shaded locations. Areas beneath trees, against north-facing house walls and on balconies with little direct sun are ideal. Planting them in groups creates a colourful carpet for months, with hardly any gaps.
Practical extras: keeping track of light, water and nutrients
The requirements of young plants change after planting. In a glass of water, they did not need to seek nutrients; in compost, they do. Two to three weeks after planting, you can start applying a light feed, such as a half-strength liquid fertiliser for balcony plants in the watering water. This supports compact, healthy growth.
Another consideration is the transition from indoor to outdoor conditions. Cuttings rooted on a windowsill should not be exposed abruptly to the full demands of outdoor conditions. A few days in a sheltered, partially shaded place will ease the stress and reduce the risk of leaf scorch or drooping shoots.
Anyone making consistent use of June for water cuttings can build up a small plant reserve with very little effort. It allows gaps to be filled at short notice, spontaneous border ideas to be put into practice, or fellow gardeners to receive home-grown young plants as gifts – all without extra expense at the garden centre.


Comments
No comments yet. Be the first to comment!
Leave a Comment