
Often, the reason comes down to two simple care mistakes.
Many houseplant enthusiasts know the situation: the spider plant looks healthy, produces long leaves, yet not a single dangling baby plant. Chlorophytum comosum is generally considered exceptionally easy to propagate. However, by giving it the right signals through light and pot size, you can encourage the plant to finally produce plantlets – and soon fill half your home with new plants.
How the spider plant “decides” whether to produce plantlets
A spider plant does not create plantlets straight away. It will usually need 1 to 2 years to become properly established in its pot. During this period, it develops strong, fleshy roots, where it stores both nutrients and water. Only once these reserves are sufficiently built up does it shift from simply growing to reproduction mode.
The familiar long, trailing shoots are known as stolons. Small leaf rosettes form at their tips, becoming the future offsets. At first, these miniature plants are supported by the mother plant and draw on its energy reserves.
A spider plant only produces masses of plantlets once it feels “secure” – with enough reserves, enough light and a touch of stress.
This exact balance of comfort and mild stress is crucial. If the plant is permanently pampered – in an oversized pot, with plentiful fertiliser and constantly damp roots – it will favour leaf and root growth over offspring. When the pot gradually becomes snug and nutrients are no longer continuously abundant, propagating through plantlets becomes worthwhile for the spider plant.
The role of light and day length: when the plant “switches”
Light is the most important trigger for flowers and, therefore, plantlets. The tiny plants later develop from the inconspicuous flowers produced on the stolons. Indoors, artificial lighting can often imitate an endless summer day – a signal for the spider plant to keep growing rather than reproduce.
For many specimens, the following rule of thumb works well:
- Position: bright but protected from direct midday sun, such as near an east- or west-facing window
- Day length: fewer than 12 hours of light daily for at least 3 consecutive weeks
- Temperature: 18 to 22°C is ideal, preferably without extreme fluctuations
- Humidity: slightly elevated, but without keeping the leaves permanently wet
Leaving a living-room lamp on until late at night may unknowingly slow stolon production. As a practical experiment, move the spider plant to a room that is kept reliably dark in the evening, such as a bedroom or a hallway with a timer. Just a few weeks of shorter days can often be enough for the plant to develop flower buds and, later, plantlets.
Pot size and fertiliser: why too much of a good thing holds it back
The pot matters just as much as light. Spider plants prefer tighter conditions than many people expect. A pot that is far too large and filled with plenty of fresh compost tells the plant: “There is room here, keep expanding outwards and downwards.” It will then direct its energy into roots instead.
A slightly root-bound pot acts as a gentle wake-up call: propagation is now worthwhile – time for plantlets.
Practical potting recommendations:
- Repot only every 2 years, once roots are clearly pressing against the pot edges or growing out through the drainage holes.
- When repotting, go up by only one pot size rather than jumping two sizes.
- Use a loose, free-draining growing medium so the roots receive plenty of oxygen.
The same principle applies to fertiliser: in this case, less produces more offspring. Feeding once a month in spring and summer is usually enough. Heavy, continual fertilising may make the plant lush, but removes its incentive to invest energy in reproduction. You can stop feeding entirely in autumn and winter.
Watering correctly: mild stress instead of constant wetness
The spider plant’s fleshy roots are able to store water. Watering every day can quickly overwhelm the root system and keep the plant in comfort mode. A better approach is to allow the top layer of compost to dry out between waterings.
A practical routine:
- Do the finger test: the upper 2–3 centimetres of compost should feel dry.
- Then water thoroughly until a little water runs from the bottom of the pot.
- Empty the saucer after a few minutes so the roots are not left standing in water.
This gently alternating wet-and-dry pattern acts as a mild stimulus. Rather than endlessly pushing out new leaves, the plant responds by investing more in stolons and plantlets.
Taking plantlets: the right time and two reliable methods
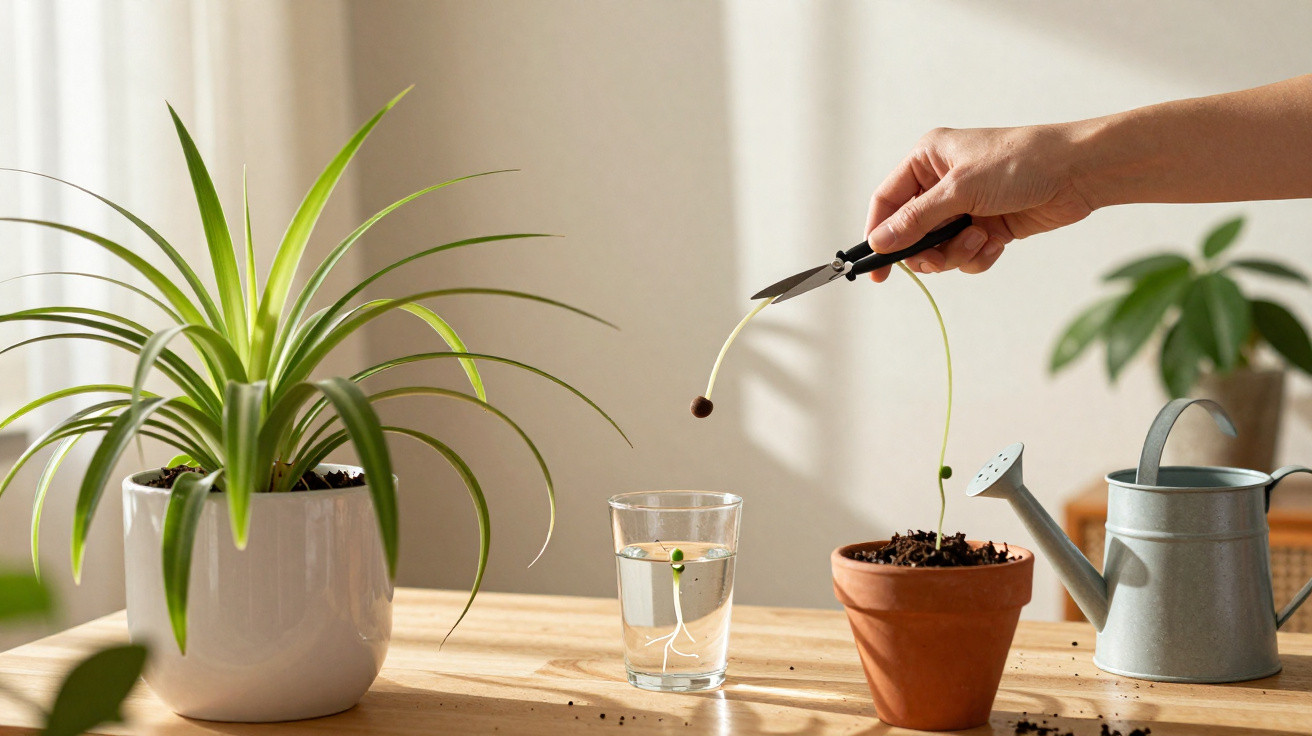
As soon as the small leaf rosettes show their first fine roots, they are ready for life in a pot of their own. Cutting them off too early can lead to weak growth, while waiting too long can hold back the mother plant.
All you need for removal is clean, sharp scissors or a small knife. Cut the shoot directly beneath the rosette; leaving a short piece of stem provides a useful “handle” when planting it up.
Rooting in water
This technique is suitable if you like to monitor what is happening below the surface:
- Place the base of the plantlet in a small glass of water, keeping the leaves above the waterline.
- Change the water every few days to prevent rot.
- After 1 to 3 weeks, roots several centimetres long will usually be visible.
- Plant it in loose compost, keeping it evenly moist for the first few days.
Planting directly into compost or pinning it to the mother plant
An even simpler option is to place a small pot of compost next to the mother plant. Initially, the plantlet remains attached to its shoot while resting or standing in the growing medium. Once it has formed its own roots there, cut through the connecting stem. Support from the mother plant helps it get established.
If you plant the plantlets directly, choose a light, well-drained growing medium and keep it evenly moist, but not wet, during the first few weeks. At this stage, the young plants need only modest light: a bright but non-sunny position is best. Apply nutrients no earlier than after 4 to 6 weeks, and only at a very low dose.
Common mistakes when a spider plant does not produce plantlets
The same issues occur repeatedly in many homes. This quick check can help you adjust your own care routine.
| Problem | Possible cause | Solution |
|---|---|---|
| Healthy plant, but no plantlets | Pot too large, too much fertiliser, light exposure for too long | Choose a smaller pot, reduce fertiliser and keep light duration below 12 hours |
| Brown leaf tips | Dry central-heating air, hard tap water, irregular watering | Increase humidity slightly, use settled water if necessary and establish a steadier watering routine |
| Plantlets shrivel | Removed too early or kept too dry | Next time, detach them with more developed roots and keep the growing medium evenly moist at first |
Why the spider plant is an ideal starter plant for propagation
Anyone trying cuttings and offsets for the first time is well served by a spider plant. It forgives many minor mistakes, recovers quickly and makes it very clear when it is thriving: by producing ever more stolons.
It also serves a practical purpose: it filters some pollutants from indoor air, tolerates tougher conditions than many tropical houseplants and looks equally at home in a minimalist office or a colourful student flat.
Experimenting with different varieties is also appealing. There are plain green-leaved forms, white-striped varieties and specimens with gently twisted leaves. Once you get the hang of it and start collecting plantlets regularly, you can gradually build a small collection – or supply friends and neighbours.
Extra tips: light, water quality and room combinations
One aspect many people underestimate is the type of lighting used. Cool-white LED panels or grow lights with a high blue-light content support compact, vigorous growth. If you want plantlets in a dark hallway, use a timer to provide 10 to 11 hours of artificial light a day, allowing you to control the desired day length.
Water quality also plays a part. In areas with very hard tap water, limescale gradually builds up around the roots. Many owners therefore use settled tap water or rainwater. The plant often responds with fresher foliage and steadier growth – an effective foundation for producing plenty of plantlets later on.
In a room, the spider plant works well with other resilient species such as snake plants or ZZ plants. These combinations have similar requirements for light and watering frequency. Grouping several plants together creates a small “jungle windowsill” visually, while also benefiting from slightly higher humidity close to the plants, which in turn helps the offsets.

Comments
No comments yet. Be the first to comment!
Leave a Comment