
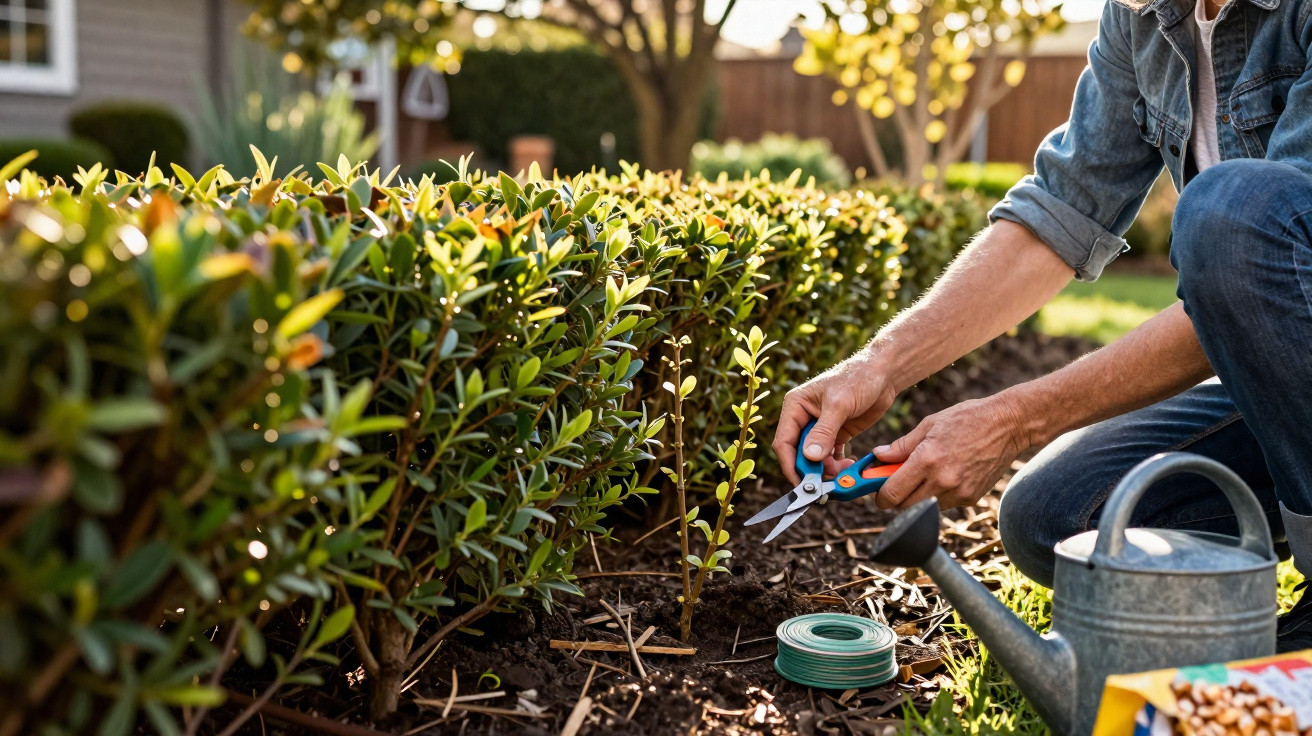
A hedge with bare patches immediately looks neglected and no longer provides a proper screen.
A straightforward, virtually free method can often fill these gaps within just a few weeks.
When a hole appears in a hedge, many amateur gardeners instinctively reach for their wallets. Yet in many cases, the existing plants can solve the issue themselves. Rather than buying more shrubs, all that is needed is close inspection, a considered pruning technique and a little patience.
Why new shrubs often do not fix a hedge
On spotting a gap in the hedge, the usual response is to visit a garden centre. It seems logical: something is missing, so add another plant. In reality, this approach is often disappointing.
A young shrub suddenly has to compete with long-established, vigorous neighbours. The mature plants deprive it of light, water and growing room. The newcomer struggles, develops more slowly and can remain behind the rest of the hedge for years.
What appears to be a missing section is not always genuinely empty, either. The hedge may simply have lost its shape, become weakened or turned bare inside. Fresh plants do little in these circumstances because the underlying cause remains.
“Before spending money on new hedge plants, check whether the existing shrubs can produce new growth again with the right pruning.”
Look closely: is the hedge dead or merely tired?
Before using a spade or spending money, carry out a quick check. Many branches that look dead are still alive.
The fingernail test
A simple test is enough: lightly scratch the bark with a fingernail or a clean knife.
- If the tissue beneath is green and moist, the shoot is still alive.
- If it is brown and dry, that branch has genuinely died.
Living but weak branches can be encouraged back into growth. Older hedges in particular often contain long, bare shoots with foliage only at their tips. Correct pruning can prompt these shoots to grow again and fill the gaps.
The role of light and air
Hedges that are planted too densely or remain in constant shade lose growth from their centres more quickly. Outer shoots shade the base, causing the plants to shed leaves or needles there. From the outside, this can look like a hole, when the real problem is insufficient light and airflow inside.
In these situations, careful thinning achieves more than adding another shrub. Removing selected branches and preventing the hedge from becoming too wide allows light to reach the lower sections, encouraging denser new growth.
The pruning trick that closes hedge gaps in weeks
The key is often found immediately beside the bare patch: properly cutting back the surrounding shoots. This effectively prompts hedge plants to form new side shoots and grow into the gap.
How to prune correctly
You only need sharp, clean secateurs. Work carefully rather than quickly: a small number of well-placed cuts is sufficient.
- Cut back the affected branches around the gap by roughly one third.
- Make an angled cut just above a bud.
- Where possible, select a bud pointing towards the gap.
This method deliberately directs the plant’s growth. Unable to continue simply growing taller, it responds by producing more side shoots. The hedge becomes fuller rather than merely higher.
“Targeted pruning slows upward growth and promotes width, allowing the hedge to grow into the gap instead of past it.”
The best time for a fresh start
Early spring is ideal, when sap is rising and plants are close to producing new growth. Hedges usually respond with fresh green shoots within a few weeks at this time.
Pruning in late summer may also work, although there is less time for regrowth before winter. In all cases, very hard pruning should be carried out in frost-free conditions, so shoots are not damaged by frost afterwards.
When a new shrub is worthwhile
Sometimes even excellent pruning can no longer help. If entire plants have died completely or there has been severe frost damage, replacement is usually unavoidable.
Choose the right variety
If replanting is necessary, remain consistent. The replacement should be the same species as the rest of the hedge. Different varieties often grow to different heights and widths, and at different rates. This creates an uneven appearance and makes future maintenance pruning more difficult.
Leave enough space
New shrubs should not be forced directly into the established root network. Giving them some room is essential for healthy development.
- Depending on the plant’s vigour, leave 40 to 60 centimetres between it and the nearest established shrub.
- Dig a generously sized planting hole and loosen the soil.
- Spread the roots gently, avoid planting too deeply, then water in thoroughly.
This enables the young shrub to establish its own roots rather than competing permanently with older plants for every drop of water.
Water and mulch: overlooked essentials
Whether you have pruned hard or planted a replacement, success depends on water. Care in the following weeks determines how well the hedge recovers.
Water properly instead of “a little every day”
Many gardeners water too frequently but too lightly. It is better to water deeply at longer intervals. This lets moisture penetrate further down and encourages roots to grow deeper as well.
- Water regularly for 4 to 6 weeks after pruning or planting.
- Give the hedge a thorough soak once or twice a week, depending on the weather.
- Avoid waterlogging: the soil should be moist, not saturated.
Mulch as a protective layer
A 5 to 8 centimetre layer of organic material around the base of the hedge acts like a protective covering. Suitable materials include:
- chipped twigs or bark pieces
- dried grass clippings
- shredded autumn leaves
- straw or other plant remains
Mulch keeps the soil moist for longer, suppresses weeds and gradually breaks down into valuable humus. Do not press it directly against the stems, however, as this can encourage mould.
How to keep your hedge dense for the long term
Once the gap has filled, the ongoing task begins: maintaining the hedge so that new bare patches do not develop in the first place.
Five simple maintenance habits
- trim lightly once or twice a year instead of cutting back severely on rare occasions
- water deliberately for several weeks after heavier pruning
- top up the mulch layer in spring when needed
- remove weeds around the base regularly so they do not compete for water
- monitor weak or thin areas early and cut them back selectively
These measures keep the hedge denser, more orderly in appearance and more effective as a privacy and windbreak screen. A thick green barrier also reduces noise and creates a more sheltered garden environment.
Practical examples and useful advice for hedge owners
With fast-growing species such as privet or hornbeam, a confident spring pruning is often enough to close substantial gaps. Thuja and yew respond more slowly, but with suitable care they can also produce fresh green growth at the edges of a bare section.
If you are unsure how much to remove, proceed gradually: it is better to prune in two stages than cut too deeply at once. After each cut, inspect the hedge again. If light can reach the stems, there is a good chance that new shoots will emerge from within.
The real risk comes from cutting radically back into old, entirely brown wood. Many conifers will not regrow from this area. Before pruning, always check that green sections containing buds are still present.
Following these steps does not just save money on replacement plants. The hedge will develop greater resilience because it can thicken up through its own growth. This is especially valuable during dry summers: a robust, well-maintained hedge stays green for longer, protects the garden more effectively and retains a uniform appearance.

Comments
No comments yet. Be the first to comment!
Leave a Comment