
The hose had been on for scarcely ten minutes, yet the soil already appeared to be thirsty once more.
It was cracked, grey and almost insulted that you had dared to put anything in it. There were two raised beds, several wilting tomato plants, and that all-too-familiar sense that you were tipping water into a bottomless pit.
Then a neighbour peers over the fence, gives a shrug and gestures towards their own vegetable patch. The earth is dark and soft, with hardly any exposed soil, while the plants look as though they have enjoyed a proper night’s rest. The sun is the same, the rain-free week is the same, but the result could not be more different.
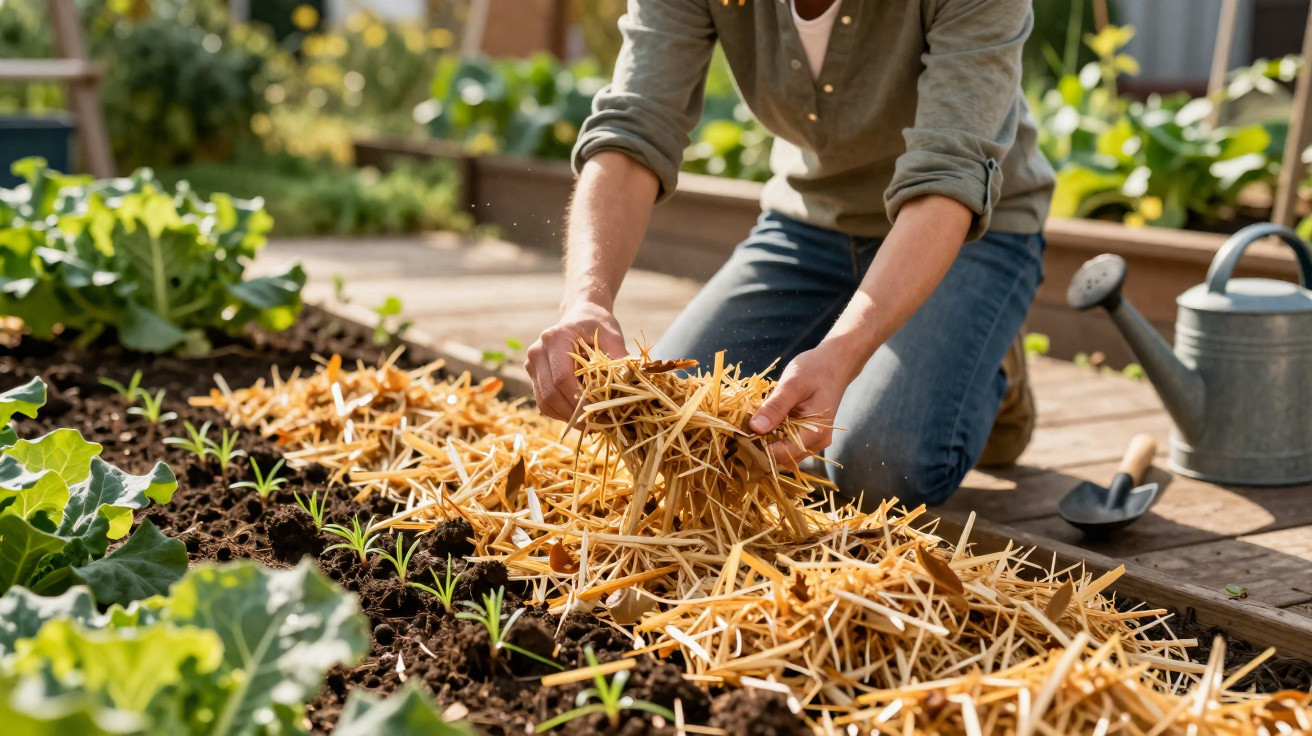
They crouch down, pick up a handful of mulch and scatter it over the ground like confetti. “This,” they say. “This is why I’m not out here with a hose every evening.”
The soil beneath their mulch is cool and moist; yours is hot and powdery. Suddenly, your perspective changes.
You begin to ask yourself what else that loose covering of organic material is doing quietly, out of sight.
Why mulch transforms thirsty, weedy garden beds
From above, mulch can seem straightforward, as if somebody simply neglected to clear up after pruning. Below the surface, though, it is doing much of the work. A 3–8 cm layer of organic matter reduces evaporation, allowing the water added to the bed to remain there long enough to reach plant roots.
The upper layer bears the force of the sun and wind. Underneath it, the soil can still breathe without becoming baked hard. Microbes continue their work, roots continue to spread, and most weed seeds never receive the light required for germination.
The result is a modest but genuinely useful microclimate: a few degrees cooler, steadier and less prone to extremes. Instead of acting like a frying pan, your bed begins to work more like a sponge.
One UK allotment study compared moisture levels in mulched and bare soil following a dry period. Even after a week without rain, the mulched beds retained roughly 25–30 % more water in the top 15 cm. Gardeners needed to water less frequently, and, when they did water, the soil absorbed it rather than letting it run sideways in small channels.
Speak to people at any community garden and you are likely to hear the same practical tale. The plot covered with straw, leaves or wood chips may look untidy in April. By August, it is often still cropping while everyone else watches their lettuce bolt and their beans sulk.
On a small balcony, a gardener I met in Lyon covered the soil in her containers with shredded cardboard and coffee grounds. Her basil remained upright long after her neighbour’s plants had collapsed in the heatwave. Her watering can was left gathering dust. That small layer of “waste” had become a water-saving device.
The reasoning is simple: bare soil is exposed soil. Each blast of sunshine and every gust of wind accelerates evaporation. Every raindrop strikes the surface like a tiny bomb, breaking apart soil aggregates and creating a crust that repels water when rain returns. Weeds quickly take advantage because disturbed, uncovered ground suits them perfectly.
Mulch breaks this sequence. It cushions rainfall, excludes the light needed by weed seeds, and moderates abrupt temperature changes that can strain young roots. As it decomposes, mulch nourishes soil life, which then helps create improved structure and greater water-holding capacity.
This is why a mulched bed can feel faintly bouncy underfoot. The earth is not merely moist: it is alive, and it responds differently when conditions turn difficult.
How to mulch for genuine moisture savings and fewer weeds
Begin with a clear bed. Remove existing weeds, including their roots, especially persistent perennials such as couch grass and bindweed. If they have gone to seed, do not leave them beneath the mulch.
Give the soil a thorough watering before applying anything. Mulch does not create water by magic; it preserves the moisture already present. Think of it as placing a lid on a pan that is already simmering.
Next, distribute your chosen material in a consistent layer 3–8 cm deep, according to the mulch type. Straw and shredded leaves can be applied more deeply. Fine compost and grass clippings should be spread more thinly to prevent them from matting together and becoming slimy.
Leave a narrow circle of exposed soil around young plant stems, roughly two fingers wide. This space permits airflow and lowers the chance of rot. Once plants are older and their stems have strengthened, the mulch can be eased a little nearer.
A common complaint is, “I mulched and the weeds still came back.” Usually, a decorative-looking layer has been laid over a bed already packed with buried seeds and roots. Mulch is a bouncer, not a miracle worker.
Let’s be honest: nobody removes every single white root perfectly before spreading mulch. The key is to deal with the worst offenders first. Lift out deep-rooted invaders, then cover the area with damp cardboard or several sheets of newspaper, overlapping the edges as you would roof tiles.
That paper layer prevents light reaching weed seeds lying just beneath the soil surface. Your mulch then performs its second role on top: retaining moisture and deterring later arrivals. It may look rustic on the first day. After a month, it fades into the scene while your plants become the focus.
Some gardeners fear they will “do it wrong” and smother their beds. In reality, a slightly patchy, visibly human mulch layer is better than bare earth every time.
“When I stopped seeing mulch as decoration and started treating it like a living blanket, my whole garden changed,” a vegetable grower in Oregon told me. “I water half as often now, and I’m not on my knees weeding every weekend.”
A few useful rules can act as quiet allies:
- Choose chunky, open materials such as straw, wood chips and shredded leaves for perennials and shrubs; opt for finer compost or leaf mould around seedlings and root crops.
- Do not use thick mats of fresh grass clippings; combine them with dry leaves or straw so they cannot turn into a slimy, anaerobic layer.
- Renew mulch lightly once or twice each season rather than depositing one huge heap at once; you are replenishing a system, not burying it.
On a hot, windy afternoon, that unobtrusive layer can feel like the one thing preventing your garden from defeat.
Choosing the best mulch and building it into your routine
Each type of mulch has its own character. Straw is light, simple to distribute and excellent for vegetable beds that need quick coverage. Shredded leaves weave themselves into a soft covering that gradually becomes leaf mould, which is especially valuable for woodland plants and berries.
Wood chips break down more slowly, are weightier and provide more structure. They work particularly well around fruit trees, hedges and paths, where they can remain in place and decompose in their own time. Fine compost works as both a top dressing and mulch, feeding the soil while offering some shade and protection.
Even ordinary cardboard, concealed beneath a more attractive covering, can turn a weed-ridden strip into productive ground within a season. Every material influences how often you need to water, how quickly you can weed, and how the soil will feel when you dig into it next year.
We have all promised ourselves a major tidy-up “this weekend”, only to discover that August has arrived. With mulching, the answer is to make the task smaller. Spend ten minutes spreading leaves after raking, or five minutes placing grass clippings around the tomatoes while the hose is running.
Mulch need not be delivered in one heroic, exhausting session. It can be added gradually from the everyday waste materials around you: coffee grounds from the morning brew, shredded paper from old bills, and prunings put through a small chipper.
A bed mulched in April begins showing its appreciation in July, when your neighbour is hauling hoses over the lawn. You simply brush the soil below the mulch with your fingertips and find cool, slightly damp resistance. At that point, it becomes clear that the effort made months earlier is paying your water bill forward.
You may also notice that the soil smells sweeter beneath the mulch. Following rain, earthworms gather close to the surface, feeding along the narrow boundary where decomposing mulch meets mineral soil. Any weed seedlings that emerge tend to be thin and delicate, easily pulled out with two fingers.
There is no fanfare to announce the difference, but your approach to watering and weeding gradually changes. You become less reactive and more aligned with the slow rhythm of decomposition and renewal. The bed stops being a problem that needs solving and becomes a system you are gently guiding.
That subtle change reaches further. Lawn clippings become “future moisture saver” rather than “bin filler”. A heap of autumn leaves becomes next summer’s protection against drought. Your garden gains a little more resilience, and so do you.
| Key point | Details | Why it matters to readers |
|---|---|---|
| Ideal mulch depth for beds | Aim for 3–5 cm of fine mulch (compost, leaf mould) in vegetable beds and 5–8 cm of coarser material (straw, chips) around perennials and shrubs. | Too little does not reduce weeds or evaporation, while too much can smother young plants and conceal pests, so this gives you the practical “sweet spot.” |
| Best time of year to mulch | Put down a main layer in late spring once the soil has warmed, then add light top-ups in midsummer and again in autumn using fallen leaves. | Following the seasons helps retain spring moisture, shield beds from summer heat and make use of plentiful free materials in autumn. |
| Water savings you can expect | In most temperate gardens, mulched beds can need 30–50 % fewer watering sessions across a dry spell compared with bare soil. | This reduction directly affects your water bill, your time and your energy on hot evenings when you would rather be doing anything other than holding a hose. |
FAQ
How close can I put mulch to plant stems? Leave a gap about 2–3 cm wide around soft stems and crowns, particularly for young vegetables and flowers. When plants mature and the stems toughen, you can gently draw the mulch nearer, but do not bury the base entirely, as this reduces the risk of rot and slug damage.
Will mulch create more slugs and snails in my garden beds? Mulch may provide shelter for slugs, especially in damp climates, but it also supports predators such as ground beetles and frogs. Around plants prone to slug damage, use rougher materials including straw or coarse wood chips, avoid dense layers of wet grass, and pair mulching with basic barriers or evening slug patrols.
Can I use fresh wood chips directly on my beds? Fresh chips are ideal for paths and around established shrubs and trees, where they will not disrupt shallow feeding roots. In vegetable beds, keep fresh chips on the surface and avoid digging them into the earth, otherwise they may temporarily lock up nitrogen while decomposing.
Is grass clippings mulch safe for vegetables? Yes, thin layers of untreated grass clippings are suitable around many vegetable plants and decompose rapidly. Allow the clippings to wilt for a day, apply them in 1–2 cm layers, and mix them with dry material such as leaves to stop a dense, smelly mat from forming.
How often should I renew the mulch layer? Most organic mulches settle and decompose within 3–6 months. Inspect your beds as each season changes, then add a light top-up whenever bare soil becomes visible or the layer falls below roughly 3 cm.
Does mulching attract pests like mice or termites? Thick, undisturbed mulch placed against wooden structures can cause problems, particularly in warm regions. Maintain a slim strip of clear soil beside timber beds or house walls, avoid creating enormous damp heaps in one location, and spread material evenly so it can dry between periods of rain.



Comments
No comments yet. Be the first to comment!
Leave a Comment