
Many homeowners know the pattern: in spring, the driveway looks newly laid, but only a few weeks later dandelions, plantain and clumps of grass are pushing up between the stones. In many areas, strict water restrictions add another obstacle, limiting traditional approaches. Even so, three targeted, entirely natural measures can keep the surface looking tidy for the long term.
Why gravel paths become overgrown so quickly
At first glance, gravel seems a neat, low-maintenance option. Over time, however, precisely what wild plants favour develops between the stones: a thin layer of nutrient-rich humus.
- Dust and flower pollen settle on the surface.
- Leaves, needles and small twigs gradually decompose.
- Bird droppings and other organic debris add further nutrients.
Together, these materials create fine soil in which seeds can germinate easily. They are carried in by the wind, brought in by birds or, in some cases, are simply already present in purchased gravel. If the gravel layer is shallow or made up of rounded, washed stones, plenty of light reaches the ground, creating ideal conditions for weeds to establish themselves.
Summer weather makes matters worse: hot spells alternate with heavy thunderstorms. With every shower, organic debris absorbs water and retains moisture. Plant roots rapidly take hold, while most people are far less keen to weed while bent over in the height of summer.
“An unmaintained gravel path is not only unattractive; tangled roots and muddy patches can also make it a slipping hazard.”
Frustration often leads people to reach for chemical products containing problematic active ingredients. These end up in the soil and groundwater, while also harming insects that are already under pressure. A well-planned mechanical and thermal approach, by contrast, keeps the area clean without any need for poisons.
First step: a mineral “shield” beneath the gravel
The most important work is done before high summer, not during it. Anyone who builds or upgrades their path properly in spring removes the conditions needed by most wild plants.
Geotextile: blocking light while allowing water through
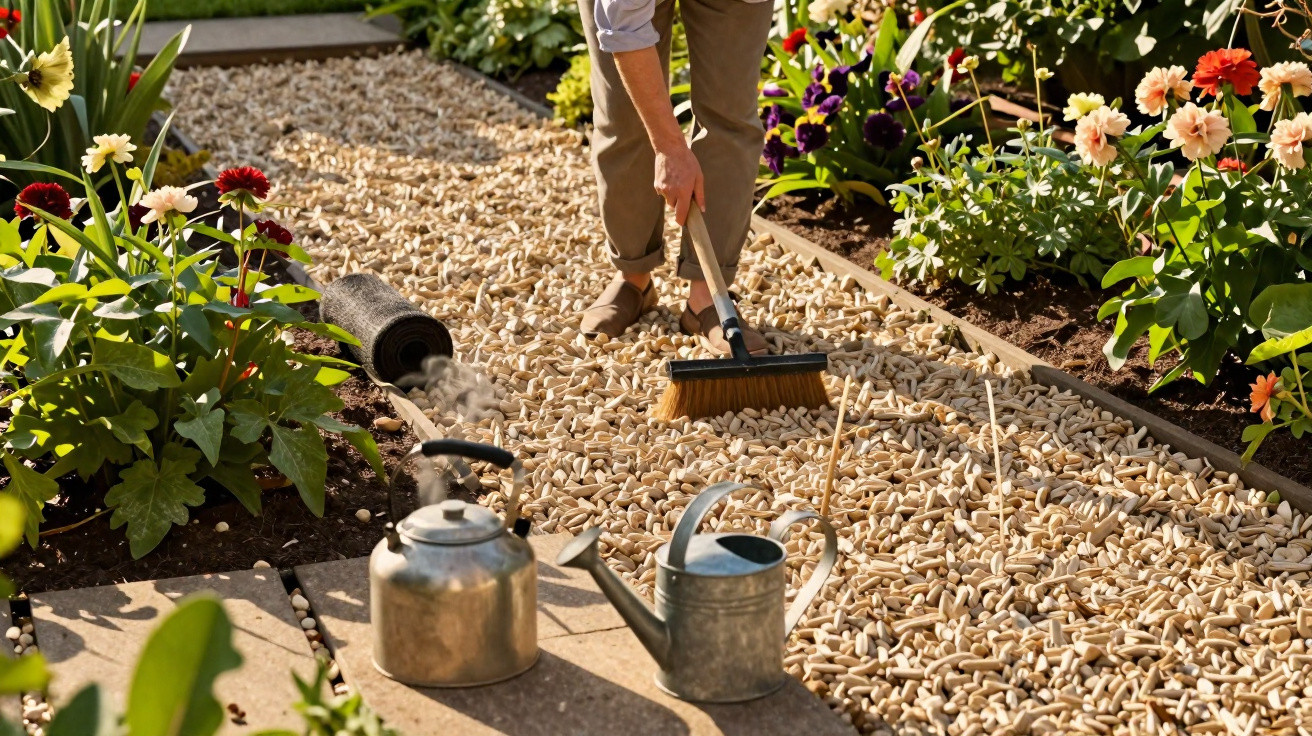
Start with a thorough clear-out: remove existing plants along with their roots, dig out substantial root fragments and take away loose soil. Next, lay a water- and air-permeable membrane over the exposed surface. This geotextile lets rainwater pass through but prevents light from reaching the ground. With no light, very little can germinate.
The gravel layer is then laid on top. The key factors are:
- Angular gravel rather than rounded decorative gravel, as its sharp edges interlock more effectively.
- A particle size of around 6–14 mm – small enough to form a dense surface, yet large enough to avoid becoming muddy.
- A layer depth of 5–7 cm – too little lets light through, while too much can make the surface unstable.
The surface should be compacted carefully, ideally with a vibrating plate compactor. Solid edging, such as concrete lawn edging, keeps the stones contained and stops grass and clover creeping into the path from the sides.
“A well-designed mineral base can save many hours of weeding later on – effectively a spring investment in a more relaxed summer.”
Second step: maintain it in small sessions with a brush
Once the surface has been prepared, light but consistent maintenance is enough. The most important tool is a stiff brush. Purpose-made joint or path brushes with metal bristles or very rigid plastic bristles are ideal. To avoid back strain, choose one with a long handle.
How the “brushing routine” works
Success depends on the timing and frequency:
- Schedule a quick brushing session every 10–14 days.
- Work in the morning or evening, when the ground is slightly damp.
- Move firmly across the gravel using circular motions.
Moisture, such as morning dew, softens young seedlings and moss. The brush can then pull them out easily before deep roots develop. This keeps the task manageable and often limits it to only a few minutes each week.
It is important to remove the loosened material consistently: collect leaves, plant debris and loose soil with a leaf rake or shovel, then dispose of it. Leaving it in place simply creates new layers of humus, providing the perfect growing medium for the next generation of weeds.
Third step: a hot-water treatment with boiling water
Some plants are more persistent. Deep-rooted species, especially couch grass or strong plantain rosettes, can repeatedly survive brushing. For these tougher cases, a surprisingly simple solution is boiling water.
Pour precisely rather than spraying widely
Ordinary tap water heated in a saucepan or kettle is sufficient. The important thing is to pour close to the ground so that the water reaches the plants in a concentrated stream. Suitable options include:
- a kettle with a spout;
- a watering can with a narrow rose-free spout; or
- a saucepan with a pouring lip.
Boiling water destroys the cell structure of above-ground plant parts within seconds and also damages the upper sections of the roots. One treatment is usually enough for delicate wild plants. More robust species may need a second application after a few days.
“Boiling water works without chemicals or residues – and saves valuable drinking water because only small, targeted quantities are needed.”
To ensure this method does not become hazardous, keep children and pets away while working. Leave some distance from neighbouring beds and lawns too, as boiling water can also damage sensitive plant roots there.
How often you should take action
Starting early in the year significantly reduces the workload. A possible schedule is:
| Period | Measure | Interval |
|---|---|---|
| Spring | Deep clean, membrane, new gravel | once only |
| Early summer | Brush the surface | every 2 weeks |
| High summer | Brushing + targeted boiling water | every 10–15 days |
| Autumn | Leaf removal, minor repairs | as needed |
Rather than tackling one exhausting job each year, the work is spread across many small, manageable sessions. Those who stick to this routine will find that germination rates fall noticeably and the path remains clean for much longer.
What else helps during water restrictions
In dry areas or where official restrictions apply, every litre matters. The good news is that these methods require almost no watering. Anyone supporting the brushing process might sometimes use a very brief spray the evening before to lightly dampen the gravel, using only a few litres.
Where water saving must be particularly strict, use morning dew instead: in the early hours, the surface is often naturally damp enough for the brush to work effectively. Boiling water can also be used in a resource-conscious way, for example by saving water that has already been heated in the kitchen, such as pasta water, and taking it outside while still hot.
Practical extra tips for a permanently tidy gravel path
A few small habits significantly strengthen the effects of the three main steps:
- Remove autumn leaves regularly so they cannot rot down into humus.
- Level tyre marks by occasionally raking the gravel back into place, preventing soil-filled “ruts” from forming.
- Check and clear kerbs or lawn edging so grass cannot spread in from the sides.
- Act promptly when the first seedlings appear – the smaller the plants, the less work is required.
When planning a new surface, it is possible to go a step further: beneath driveways subject to heavy use, a stabilising cellular grid can be installed instead of using gravel alone. It distributes weight, prevents ruts and keeps the gravel permanently in place. Less movement in the material automatically leaves fewer opportunities for emerging plants to establish themselves.
Many people initially worry that natural methods will not be sufficient. In practice, the opposite is often true: when the base is right and maintenance routines are carried out regularly, the driveway remains remarkably tidy even through hot, dry summers with water shortages. The combination of a mineral “armour”, a brush and boiling water is an excellent replacement for prohibited chemical weedkillers, while protecting the garden, groundwater and your back at the same time.

Comments
No comments yet. Be the first to comment!
Leave a Comment