
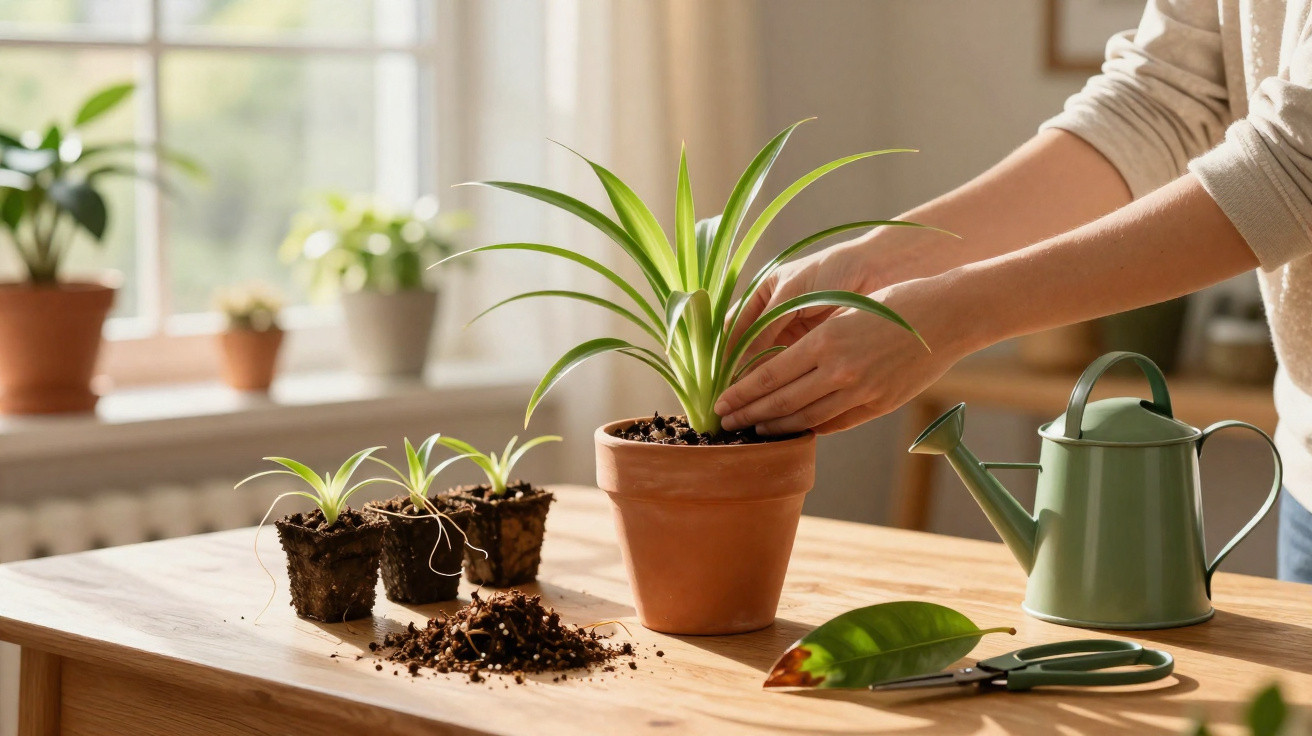
Dull green foliage, brown tips and limp, drooping leaves: what still looked “fairly okay” in December can suddenly stand out unpleasantly in spring. Right now is when it is decided whether your spider plant (Chlorophytum comosum) becomes a lush summer showpiece or continues to struggle. A few well-chosen steps in March and April will create the basis for dense, healthy foliage.
Why spring is the turning point for the spider plant
From March onwards, the spider plant begins growing vigorously again. Sap starts flowing, fresh leaves emerge, and the plant responds more quickly to care while also forgiving minor mistakes more readily. It copes far better with repotting, a change of position and light pruning at this stage than it does in winter.
However, neglected care is also more likely to show during this period. Water left standing in a cachepot, relentless midday sunshine through glass and completely exhausted compost can all result in yellowed or scorched leaves, weak growth and a lack of plantlets.
Anyone who consciously checks over their spider plant in spring will enjoy a dense, fresh cushion of foliage throughout the summer.
Six spring habits your spider plant genuinely needs
A thorough annual check is more effective than constant half-hearted tinkering: that is the essence of an ideal spring routine for a spider plant. These six measures are entirely sufficient to bring it into top condition:
- Remove dust from the leaves: Wipe both sides of every leaf with a soft, slightly damp cloth. This helps the plant breathe more effectively and make better use of available light.
- Trim away dry growth: Cut off dried leaves and brown tips at an angle using clean scissors. The plant immediately looks tidier, and this encourages fresh growth.
- Adjust the watering routine: Water only once the top layer of compost has dried out. Then remove any surplus water from the saucer.
- Improve water quality: Rainwater or tap water that has been left to stand for at least 24 hours greatly reduces the risk of brown leaf tips.
- Feed in moderation: Add a heavily diluted liquid fertiliser for foliage plants to the watering water once a month.
- Check for pests: Inspect leaf axils and leaf undersides regularly for mealybugs, scale insects or fine webs.
When watering, remember that spider plants prefer compost that is lightly moist, never wet. Small, regular amounts of water, adjusted to the room’s temperature and humidity, are preferable. Testing the compost with a finger is more reliable than following a rigid watering schedule.
The right position: plenty of light without the magnifying-glass effect
As the sun rises higher in spring, the light conditions indoors change dramatically. A spot that was perfect in January may become punishing by April. Behind the glass of a south-facing window, sunlight can quickly act like a magnifying glass.
The spider plant thrives in bright, indirect light. Suitable locations include:
- East- or west-facing windows, either on the sill or positioned slightly away from it
- A south-facing aspect, set 1–2 metres back from the window or screened by a thin curtain
- Bright rooms with plenty of diffused light, such as a hallway or bedroom
Faded leaves, dry brown patches and scorched tips on the side facing the sun are typical signs of excessive sunlight. Usually, moving the pot a little further back or adding a light screen is enough to solve the problem.
Pale leaves usually do not mean “too dark”; they often mean “too much direct sunlight through the window glass”.
When a larger pot benefits the spider plant
Spider plants do prefer to be slightly snug in their pots, but eventually their roots run out of room. It is time to change pots at the latest when roots grow through the drainage hole or the root ball feels like a firm mass when lifted out.
How to repot in spring
March to May offers the best conditions for the plant to recover quickly after repotting. Proceed as follows:
- Choose a new pot that is only one size larger than the current one.
- Cover the bottom with a thin layer of expanded clay or coarse gravel to provide drainage.
- Use loose compost for foliage plants, ideally mixed with a little sand or perlite to improve aeration.
- Carefully remove the plant from its old pot and gently loosen compacted roots.
- Place it in the new pot, fill around it with compost and press it down firmly.
- Water generously, allow excess water to drain away, then water a little more sparingly for several days.
Following successful repotting, the spider plant produces fresh, sturdy leaves and often more plantlets too. Overall, it will appear fuller and more robust.
Removing plantlets: turn one pot into many
Long, trailing shoots bearing small plants at their ends are a characteristic feature of Chlorophytum comosum. You can easily use these “babies” for propagation, ideally in spring when the parent plant is already in an active growth phase.
There are two common methods:
| Method | Procedure | Advantage |
|---|---|---|
| Layering | Let the plantlet root in a pot of compost without cutting it off. Separate it only once roots are visible. | Very gentle, with almost no losses |
| Planting immediately | Cut off the plantlet and place it straight into a small pot of moist compost, keeping it evenly moist. | Faster, ideal for raising many plants at once |
It is important not to let young plants dry out during their first few weeks. A bright location without direct sun helps them establish. The parent plant will also benefit if you do not remove every shoot at once, but work gradually.
Brown tips and limp leaves: what causes them
Spider plants are rightly considered uncomplicated, but they do react when their care is unsuitable. The most common problems can usually be clearly identified:
- Brown leaf tips: Often caused by water that is too hard, dry centrally heated air or irregular watering.
- Yellow leaves starting at the bottom: Older foliage that the plant is naturally shedding, which is perfectly normal in moderation.
- Limp, mushy leaves: A sign of waterlogging or compost that remains wet for too long.
- Fine webs and speckled leaves: An indication of spider mites, particularly where the air is very dry.
Regular dusting, watering and checking, combined with an early response to symptoms, prevents more serious damage. One careful inspection in spring can save many worries in summer.
Indoor climate, air quality and suitable plant companions
Chlorophytum comosum is happiest at room temperatures between 18 and 24 degrees. It can tolerate cooler spells for a short time, but temperatures below 10 degrees become problematic in the long term. It also dislikes draughts, such as those caused by windows frequently left on the latch in winter.
Spider plants are regarded as classic “office and bedroom plants” because they cope with drier air better than many tropical species. Even so, they reward a modest increase in humidity with richer green foliage. Bowls of water placed nearby or grouping plants together can help.
The spider plant combines well with hardy foliage plants such as peace lily, Zamioculcas or smaller fern varieties. Its cascading leaves add visual depth on shelves, cupboards or in hanging planters, quickly creating the impression of a small indoor jungle.
Anyone seeking improved indoor air benefits twice over: the spider plant is among the species that absorb pollutants from the air and release oxygen. Although the effect is difficult to measure in a typical home, combining it with other plants can still create a more pleasant feeling in the room.
With the right spring habits - carefully adjusted watering, a checked position, fresh compost and a critical look at leaves and roots - the spider plant develops into the dense, fresh focal point you want for summer. Once this routine becomes familiar, you will find that “easy-care” really does become “almost indestructible”.
Comments
No comments yet. Be the first to comment!
Leave a Comment