
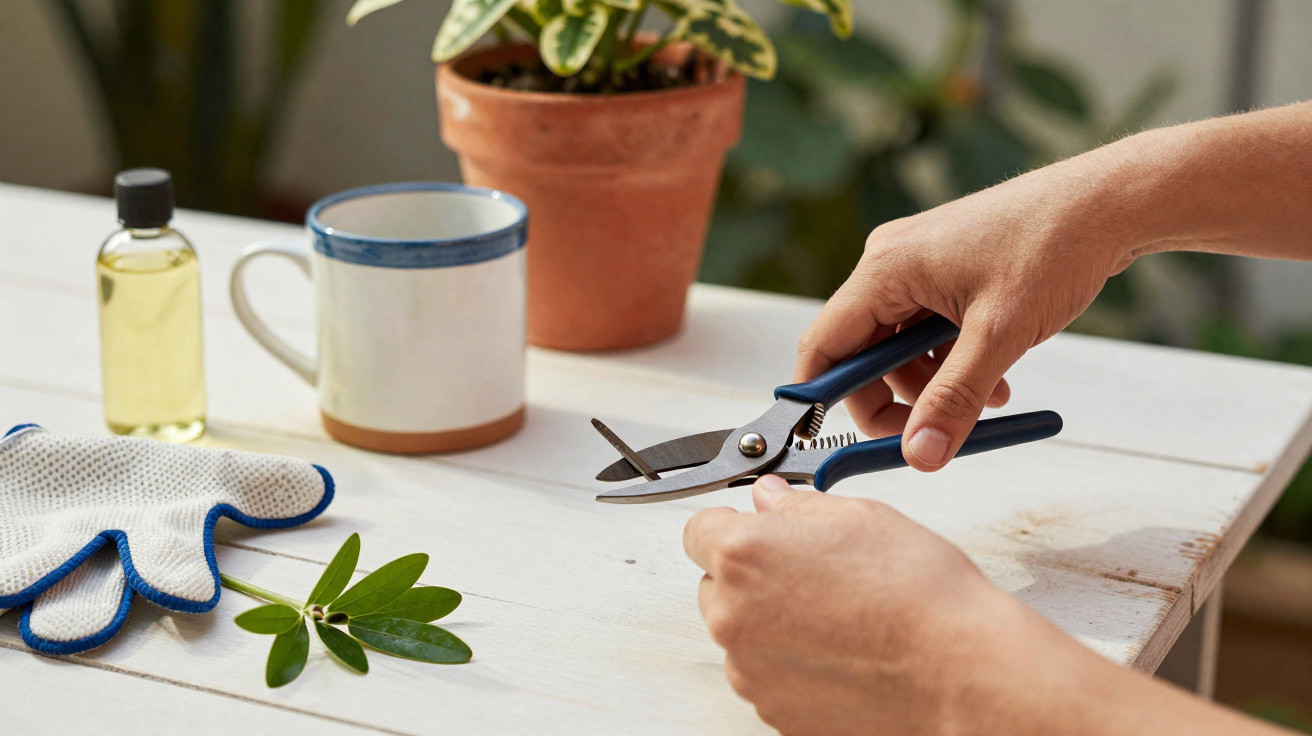
You close the pruning shears around a brittle twig, anticipating a crisp “snap”, but hear a soft crunch instead as the bark rips. The branch remains partly severed, as worn-out looking as your gripping hand. You rub the blades on your trousers, pretending a little grime caused the problem, although you already know the truth: the shears are blunt, and have been for some time.
On the garden table, the metal no longer has a cutting edge. There is rust around the pivot, sap stuck to the blade and a dull, rounded grey strip where a shiny bevel once was. You consider replacing the tool or searching for a sharpening stone that will be used once before disappearing into a drawer.
Yet there is a simpler solution, beginning with an item you probably already own.
When pruning shears begin failing in your hands
Blunt pruning shears reveal themselves through small, frustrating moments. A branch splinters rather than being cleanly cut. You squash a rose stem and must twist it free, feeling slightly brutal. Your hand starts to cramp because you keep squeezing harder, attempting to make metal cut when it has lost the will to do so.
It is easy to blame the plant instead. “This shrub is tough this year.” “This variety is woody.” In reality, the shears are struggling with a worn edge. Although gardeners do not often mention it, dull blades are a major reason plants look hacked about after pruning.
A sharp pair of pruning shears feels noticeably different from the very first cut. Its blades slide through the stem, producing a fast, clean sound. Far less force is needed, and the job can suddenly feel almost relaxing.
The contrast was clear on a small suburban balcony one late spring. A neighbour named Marta spent an afternoon cutting back her geraniums and herbs. Her basil appeared shredded, with torn leaves and uneven stems. She believed she simply had “no green thumb”. The cheap shears she had bought from a supermarket years earlier had never been sharpened.
A week afterwards, a different neighbour lent her his old but carefully maintained shears. The plants, hands and gardener were exactly the same. This time, the cuts were tidy, the stems healed more quickly and the basil produced fresh shoots. Her technique had not changed; only the sharpness of the cutting edge had.
Arborists often repeat one figure: a blade that is properly cleaned and sharpened can cut damage to plant tissue by more than half. Plants recover sooner, infections are less likely to take hold and growth restarts faster. That figure is not printed on the tool, but its effects are visible a month later in the plant’s fuller growth.
The reason is almost painfully straightforward. A sharp edge focuses your force on a very narrow line. Cells in the stem are cut smoothly, much as carrots are beneath a chef’s knife. A blunt blade compresses the stem before tearing it apart. More cells break, more sap escapes and a larger area is left open to fungi and bacteria.
There is another consequence that is seldom discussed: tiredness. Blunt shears make your fingers and wrist work far harder than they should. The ache after an otherwise simple pruning session is not “just age” or “I’m out of shape”. It is the metal making your joints compensate for its lack of sharpness.
The formula, then, is straightforward: sharper blades mean healthier plants and less discomfort. What puts many gardeners off is the assumed need for expensive stones and specialist angles. This is where a quick technique becomes useful.
A quick pruning shears sharpening trick using household items
The quickest route to a razor-sharp edge for pruning shears does not begin at the hardware shop. It begins in the kitchen. An ordinary ceramic mug or plate has a useful hidden feature: its rough, unglazed ring underneath can work like a fine sharpening stone.
Turn the mug upside down and run a finger over the grainy circle on its base. That is the improvised sharpener. Open the shears, remove all dirt and sap with a cloth, then dry them thoroughly. Moisture and grit simply drag across and scratch the metal. Next, locate the bevelled side of the cutting blade: this is the pre-angled side, rather than the flat one.
Place that angled edge against the ceramic ring, following its existing slope as closely as possible. Pull the blade along the ring in smooth, light motions directed away from your body. Ten to twenty strokes across the unglazed ceramic will often be sufficient to revive the edge.
Let us be honest: nobody really does this every day. Most people only remember their shears once branches start resisting them. That is why the method should be fast and forgiving, with no requirement for a perfect angle, specialist grip or baffling terminology.
Applying too much pressure is the most common error. Pressing down hard bites into the ceramic, makes the stroke uneven and may round the edge rather than refine it. Imagine wiping condensation from a window instead of carving stone. Gentle, repeated movements are more effective.
Sharpening the incorrect side is the second pitfall. With bypass shears, sharpen only the bevelled cutting blade. The flat side should remain virtually untouched, apart from perhaps one or two very light passes to clear minute burrs. Aggressively working both sides produces a “V” shape that no longer meets the anvil correctly, causing the shears to crush stems again.
Many gardeners overlook the initial task of cleaning, too. Sap, resin and tiny metal fragments collect along the cutting edge. Rubbing that debris across ceramic amounts to polishing dirt. Warm soapy water, a little white vinegar on rusty marks and a dry cloth are all that is needed to allow the blade to make genuine contact with the ceramic.
“The day I realised a coffee mug could sharpen my tools was the day sharpening stopped being a chore and became a five‑minute ritual,” confided an elderly gardener who has been tending roses longer than some shrubs have been alive.
There is a discreet pleasure in these simple, low-tech solutions. They seem straightforward and even mildly defiant in a world eager to sell a new gadget for every issue. They also make sharpening part of everyday life: after coffee and before the mug goes into the sink, give the blade five swift strokes.
- Turn over a ceramic mug or plate, using its unglazed ring as the sharpening surface.
- Make light, repeated strokes only on the bevelled side of the cutting blade.
- Wash and dry the shears before sharpening, then add a drop of oil to the pivot.
Sharper tools, a calmer mind and a better garden
Restoring metal with your own hands can feel surprisingly personal. Meditation is not for everyone, but the steady repeated action of sharpening against the base of a mug comes close. You hear the soft scrape, see the edge begin to shine and notice the resistance lessen as the blade glides more smoothly with every pass.
In practical terms, the next pruning job immediately shows whether it has worked. The first cut is the real test. The shears close with less effort, leaving a neat pale line through the wood rather than a bruised, ragged injury. You can move through the branches more confidently, with much less irritation.
On a human level, this small habit changes the tone of the day. Instead of “fighting with tools”, you are “working with them”. It is a modest change, yet in a world where so much seems built to fail and be discarded, maintaining one pair of sharp shears for years feels quietly radical.
| Key point | Detail | Benefit for the reader |
|---|---|---|
| Improvised sharpener | Use the unglazed ring beneath a ceramic mug or plate | Avoids buying specialist tools; the method is available at any time |
| Correct technique | Use light strokes on the bevelled side only, 10–20 passes | Quickly restores a razor-sharp edge without technical knowledge |
| Plant and body health | Cleaner cuts heal faster and require less hand force | A healthier garden and less fatigue or pain while pruning |
FAQ:
- How often should I sharpen my pruning shears? For normal home use, a brief touch-up every few weeks during the busiest season is enough. If you prune only now and again, sharpen them when resistance becomes noticeable or cuts start tearing.
- Will a ceramic mug damage my blades? No, provided the ring is unglazed and your strokes remain gentle. It behaves like a fine stone, taking away a very thin layer of metal rather than grinding harshly.
- Do I need to oil the shears after sharpening? Yes, applying one or two drops of light oil to the pivot and blade helps prevent rust and keeps the action smooth. Wipe away the surplus so that sticky sap does not build up.
- Can this method fix very rusty or chipped blades? Severe rust and deep chips need additional work, usually with a file or a proper sharpening stone. The mug trick is most suitable for maintaining an edge, rather than restoring badly damaged metal.
- Is this safe for all types of pruning shears? It works effectively on most bypass shears and many anvil models. Concentrate on the principal cutting blade, and keep your fingers clear of the edge while sharpening.


Comments
No comments yet. Be the first to comment!
Leave a Comment